No matter if you are a student, working for a company, or even own your own business, you have most likely heard of, and used, Google Slides.
Similar to Microsoft’s PowerPoint, Google Slides is a cloud based, web-application to create and save presentations without any software downloads. The advantage of using Google Slides is that it's lightweight, intuitive, and collaborative.
With Google Slides you can create and present professional pitch decks, project presentations, training modules, and more.
In this guide we'll walk you through the basics of using Google Slides, and provide more advanced tips to create high-end presentations that will help your business grow.
Google Slides 101 Table of Contents
- Getting Started
- Creating a New Slides Presentation
- Adding, Hiding, and Removing Slides
- The Menu Bar, Explained
- The Toolbar
- The Slide Master
- Editing Slide Layouts
- Inserting and Editing Text Boxes
- Formatting Text
- Tables
- Inserting and Editing Images
- Shapes
- Grouping Objects
- Charts
- Inserting Videos in Your Presentation
- Transitions and Animation
- Cloud and Collaboration Features
- Working Offline
- Saving Your Work
- Version History
- Presenting with Google Slides
- Printing Your Presentation
Getting Started

Google Slides is a free offering as long as you have a Google account. If you are a company using G Suite, you will have even more storage and functionality available to you.
If you'd like to learn more about G Suite for Business, contact us and we'll be happy to help you get started.
Creating a New Slides Presentation
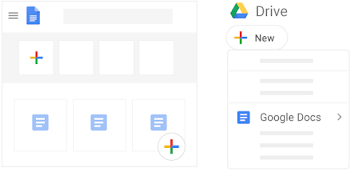
Head to Google Drive, and click New at the top left of the dashboard. Here you should choose Google Slides, and then Blank Presentation. Here you can also choose to build your Slides from a template.
If you would like to start with a blank presentation, click on the blank template by using the plus sign beneath Start a new presentation in the top left of the main page. Once you have created your new Slides document, you can rename it by clicking Untitled Presentation in the top left corner, which will be immediately deleted to allow you to title your presentation.
There is no save button, and changes will be saved automatically while using Google Slides.
Adding, Hiding and Removing Slides
It's easy to add, hide, duplicate, or delete slides in your Google Slides presentation.
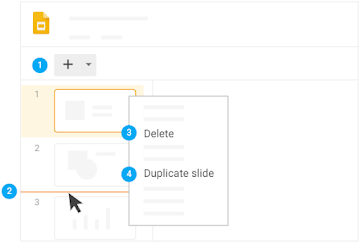
- Add: Right click the slide thumbnail, and select New Slide to add a slide. In order to duplicate a slide, right click the thumbnail of the slide in the left panel, and select Duplicate slide.
- Hide: Sometimes while creating a presentation you may want to keep a slide in your deck, but not want it to show during the actual presentation. If this is the case, right click on the thumbnail of the slide, and select Skip. It will now appear that this slide has faded back, and when you present this slide will not show. To un-hide a slide, right click again and click to remove the check mark next to Skip.
- Remove: Simply click on any slide thumbnail that you wish to remove, and press the Delete key on your keyboard. Alternatively, you can also right click and select Delete.
The Menu Bar: Explained

The menu bar is at the top of the page, and will contain all of the main functionality to build your presentation. This menu is included in every Google software, such as Docs. The selections include: File, Edit, View, Format, Slide, Arrange, Tools, Add-ons and Help.
The Toolbar
The toolbar has many different features to help you create a professional looking presentation. This is located directly under the menu.

There are a few main tools to know about:
- Paint format: This is the 5th button from the left in the toolbar, which looks like a paint roller. This tool allows you to copy and paste the formatting of any object, and immediately apply it to another.
- Zoom: Directly after the paint format button, is the zoom function. This button only allows you to zoom 50, 100 or 200 percent. If you would like to zoom with more accuracy, press CTRL,ALT,+ and CTRL,ALT, - .
- Image: The 9th button on your toolbar allows you to insert images into your presentation. Here you can insert images from your drive, any website, or from your computer.
- Bullet points: The bullet tool is the 5th button when counting from the right side. To create bullets, highlight your text, and then press the bullet button. Next to the bullet button there is also a numbered list, which you use to organize your information in a different way.
The Slide Master
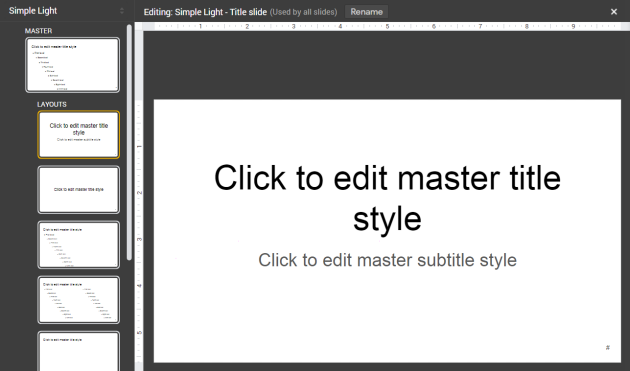
This section controls the general layout of your presentation. You can set up backgrounds, color schemes, fonts and layouts for all of your slides at once.
It is recommended to set up your master settings when you first start a presentation, because if you change these settings after you have already begun editing, all of the settings for all of your slides will change as well.
To go to your master settings, head to the View tab in your menu bar, and click Master. On your left side, you will see multiple preset layouts, and at the top of these is the master layout.
Editing Slide Layouts
In Slides, you have the ability to make different types of slides such as title slides or agenda slides. If you want to make small tweaks such as to the background color or adding images, you can do so by editing each individual slide layouts. This can be found underneath the master layout, where you will see each option for editing each slide layout.
To edit a slide layout, find it on the left side of Master View. You can create a new layout for any slide, whenever you choose, but right clicking on Any Layout, and choosing New Layout.
Once you have selected a new layout simply begin editing how you would any other slide. You can add, alter, move or delete objects until you have created your desired layout.
Then right click the layout’s thumbnail on the left panel, and select Rename Layout. Finally a new window will appear and you can give it a name.
Inserting and Editing Text Boxes
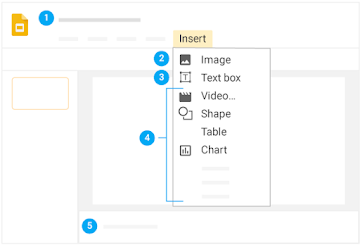
Creating a text box allows you to place text in any part of a slide. To do this simply go to Insert in the menu, and click on Text Box from the menu. Then click wherever you would like to place text, and begin typing.
Many other text editing tools can be found in the toolbar, such as font, color, size, as well as bullet points or alignment.
Formatting Text
Slides gives the option to format your text, by first selecting the object or text box you wish to do work on, and then clicking the Format Options button, at the right end of your toolbar. Here you will see a pop up box that includes Size, Position and text fitting.
Tables
Whether you are making a presentation about saving the environment, or trying to show statistics on how different products sold this past quarter, tables are very useful.
To insert a table into a slide on your presentation, go to the Insert tab, and place your cursor over Table. Then you will be given the option to select how many columns and rows you want in your table.
Inserting and Editing Images
Images are also a wonderful addition to any presentation. To add images to your Google Slides presentation, either go to the toolbar and select the image button, or click Insert, and then Image from the menu bar.
Here you can upload from your Google Drive, your computer, or directly from an external device. Additionally, if you have an image you would like to place in your presentation from the internet, you can also select By URL, and paste the link to the photo in the box.
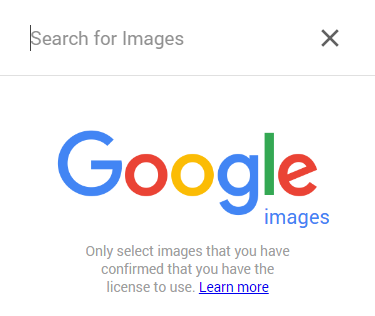
There is also a built-in Google Image Search feature. Select Image and then Search the Web.
Shapes
Shapes can be a helpful part of helping your viewers understand your message.
There are two options to insert shapes, either by clicking the Shape button in the toolbar, or clicking Insert and then Shape, in the menu bar.
If you would like to change the size of your object but keep the same dimensions, press and hold SHIFT while dragging the corner of your shape.
Grouping and Ungrouping Objects
You might find that you have objects in your slide that intersect such as a text box on top of a shape. If this is the case, you may want to group them for easy moving and sizing.
To do this, click on all objects by holding shift while selecting these objects. Then either right click the object and select Group, or use CTRL, ALT and G at the same time. These objects will now all be grouped.
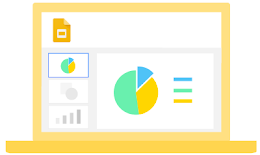
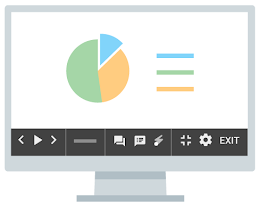
Charts
Google slides gives you the option to create four types of built-in charts: Bar, Column, Line and Pie.
To add a chart to your presentation, head to the Insert tab in the menu bar. Then click Chart, and choose which style of chart you would like in your presentation.
To edit the data in your chart, select the chart and you will see an arrow in the right hand corner that looks like a “v”. Here you will see a few options, but click on Open Source. This will open a popup, where you can edit the data included in your chart.
After adding your data, close this popup and click the UPDATE button, and your chart will reflect your data.
Inserting a Video
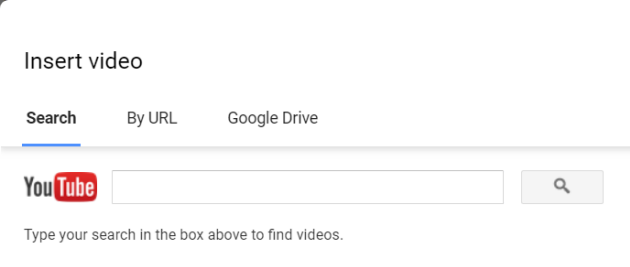
Videos are a wonderful way to convey a message and utilize a small amount of space.
To insert a video, go to the insert tab in the menu bar, and then select Video. Soon you will see three tabs at the top of the window: Search, By URL, and Google Drive. These are three places in which you can take videos from.
Search gives you a search bar and the Youtube logo, which will allow you to insert any video from Youtube. If you choose to insert a video By URL, you must have the link to a video that you want to use (get this from YouTube by clicking "Share" under the video). Paste the link into the box labeled Paste YouTube URL here. Then enter and hit Select, and the video will then appear on your slide.
If you have something saved on your computer, you can upload it to your Google Drive. After that, you can select this video from your drive, hit select, and add it to your slide.
Transitions and Animation
One well known feature of Microsoft’s PowerPoint, is the fact that the user can add transitions and animation, and this is the same with Google Slides.
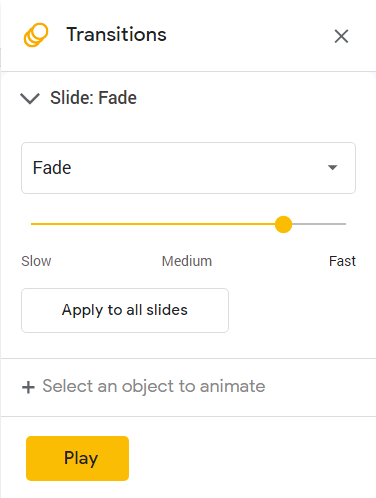
Transitions are the way in which each slide changes to the next. To add a transition, go to the toolbar and select Transition. This will open the transition and animation panel, which should automatically be set to No Transition. Select this, and then select the transition in which you wish to use.
Animation is similar, but instead of how each slide is introduced, you can animate each object. This can be accessed in the same area as transitions, but you can also click on Insert in the menu, and then select Animation.
To animate any object, select the object, and then head to Insert and Animation.
You will see many different options regarding animation and can choose from many different options. Fade in and Fly in will make your objects appear on to your slide, while Fly out and Fade out make your objects disappear.
Cloud and Collaboration Features
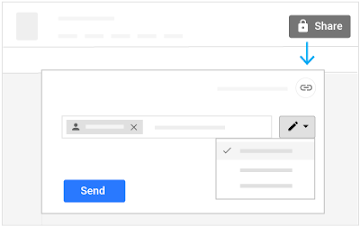
Along with the rest of G Suites features, Google Slides also has auto-save and cloud collaboration features. These collaboration features include a real-time collaboration feature which allows colleagues or friends to work on the same project at the same time.
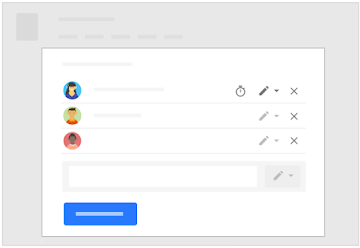
If you would like to share a presentation, you can either give them access to view edit or comment on the presentation.
To share a Slides presentation, go to the File tab and select Share. There is also the option to click the blue SHARE button on the top right of the screen. This will open a window where you can put in email addresses to share your presentation.
Working Offline
If you happen to be traveling or do not have a good internet connection, you can use Slides offline in a Chrome browser.
To set up Google Slides for offline use you must first be connected to the internet and using a Chrome browser. Head to Google Drive, and click the settings icon. Under General, you will need to make sure that the Offline box is checked, and then click Done.
Next you should go to the Slides homepage, and click on the main menu button which looks like an icon with 3 horizontal lines. Then go to Settings, and make sure that your Offline button is on, to the right. This should make it so that you can disconnect from the internet and work offline.
After you reconnect to the internet, your changes and new work will automatically sync to your Google Drive.
Saving your Work
If you are working online with Slides, there is an auto-save feature that is constantly updating your work to the cloud. This is why you will never see a save button in slides, because you never have to worry about doing so.
You can also save your work to your desktop, but first you will have to convert it to a different file type.
Version History
One great feature of Google Slides is the ability to revert back to an earlier version whenever you would like. On the menu bar, after the Help tab, there is a clickable text saying “All changes saved in Drive,” or it might say “Last edit made ___ days ago.” Click this, which will open up the version history window and you will be able to go back to any earlier version of your presentation.
If you want to completely revert your document to an earlier version, click Restore This Version in the top left. If you do this, you will lose your current version, so be aware that this is a permanent change.
Presenting with Google Slides
There are a few modes in which you can present your presentation. You may want to simply watch your presentation and practice with it before actually doing so, and you can do this by clicking Present, in the top right corner. There are also a few other options from the drop down menu.
- Presenter view: This is where you can see an extra window where you can time your presentation, see each thumbnail, and read speaker notes.
- Present from beginning: This is the standard presentation view, and exactly what you would see if you clicked on Present.
- Present on another screen: This option is only for those who have Chromecast. If you are able to connect your Chromecast device to a TV screen, this is where you would go. Otherwise you will need an HDMI cable, and do your presentation in regular present mode.
Printing Your Presentation
If you find the need to print your slides, head to File, and then Print. This opens a new window with a print preview of the slides. There will then be a few options to print your presentation.
You can either choose to print All Pages, or type in a specific range. You can also decide either on color/black & white, Paper size, and Image quality of your printed presentation.
Another option you have is to print with speaker notes. These can be helpful if you want to use your slides and notes to give a presentation. Go to File, then Print Settings and Preview. This will open a new window to show you how your slides will look when printed.
Slides: A Powerful Alternative to PowerPoint
Google Slides is not only an incredible alternative for Microsoft’s PowerPoint, but is a great option generally for businesses and students alike.
Not only is the auto-save feature incredible in case of computer crashes, but for all of your presentation needs, Slides gives you the option to truly customize and present in an easy, and professional looking manner.
Bookmark this guide as you get the hang of using Google Slides, or review one of our favorite resources which we've included as links below. If you're new to relying on slides for presentations or pitch decks ... welcome! You will soon realize how helpful Google Slides can be, and the impact that Google's flagship presentation tool can make for students and businesses.
If you're a business using G Suite (or considering switching to Google from Microsoft), contact Suitebriar.
We provide white-glove support and training tailored to the needs of your business to help you make the most of your investment in the cloud.

You May Also Enjoy Our Other Google Product Guides
Additional Google Slides Resources
Here are a few of our favorite resources and guides for Google Slides. If you didn't find exactly what you needed in this article, we suggest checking one of these fantastic resources.
- What Can You Do With Google Slides? - G Suite Learning Center
- The Ultimate Guide to Google Slides - HubSpot
- Google Slides: The ULTIMATE Guide - BrightCarbon