

It seems too good to be true: a web-based word processing program that is completely free? Google's suite of productivity apps continues to impress and their Docs program is no different.
There are no catches, no subscriptions, no downloads, no fees, and there's no credit card required to use Google docs. All you need is an internet connection and a Google account (which you would already have if you happen to use Gmail or G Suite) to access just about everything Google has to offer - including Docs.
|
With Google Docs you can write reports, create joint project proposals, keep track of meeting notes, and much more. |
Google Docs is a user-friendly and simple platform to navigate, especially if you have ever used other word processing tools such as Microsoft Word. While free, Docs does not skimp on features and there are no locked features that require a premium paid membership to access. Docs (and other programs in Google's G Suite) can be accessed through any web browser or the free apps can be downloaded onto a mobile phone or tablet.
Google Docs 101 Table of Contents
- Creating, Collaborating & Sharing in Google Docs
- Google Docs Page Setup
- Formatting Your Doc
- Google Docs Keyboard Shortcuts
- Using Add-Ons and Extensions in Google Docs
- Syncing to the Cloud
- Uploading & Downloading Google Docs
Creating, Collaborating, and Sharing
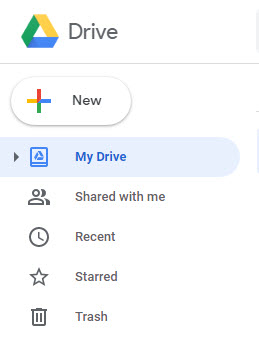
You can create a new documents through Google Docs, which are automatically saved in the Docs app, or you can also create and organize these documents in Google Drive alongside other file types. To create a new document in either app, there is a plus symbol (+) in the Google colors (red, blue, green, and yellow) towards the top left of the screen.
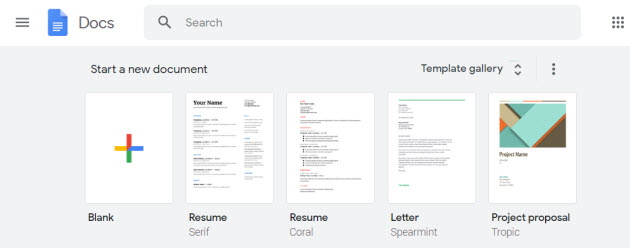
From Google Drive, you will have various options including Sheets and Slides while on the Google Docs app, you will only have the option of creating a new Doc but you can select from a few templates.
One of the best advantages of Google Docs is the ability to collaborate with other users in real time.
From Docs or Drive, documents can be easily shared with other people regardless of whether they have a Google account or not. From the document, you can click “File” and the very top option is “Share”. You can choose to get a shareable link or enter email addresses to send the document to select individuals. Alternatively, there is a big blue share button at the top right that has the same function.

Permissions are highly customizable - it’s possible to choose who can view the document, who can edit it, and who can leave comments.
If other users make changes to the document, their changes are tracked automatically and tied to their user ID so that you know who made the changes.
In “Sharing Settings” clicking the “Advanced” button in the bottom right corner also leads you to additional options that can prevent other users from sharing the document further and a separate option to prevent users from being able to download, print, or copy the text.

One of the best features of Docs and other productivity apps from Google like Sheets and Slides is the ability to collaborate and work together, and sharing your documents and files with others with proper permissions is easy to do with Google Docs.
Related: Google Docs vs Microsoft Word - What Are the Differences?
Page Setup in Docs
If you happen to know that you need certain margins, a different page orientation, or a certain size of document (letter, legal, leger, etc.), then you can adjust these parameters by clicking “File” then finding “Page setup” towards the bottom of the list.
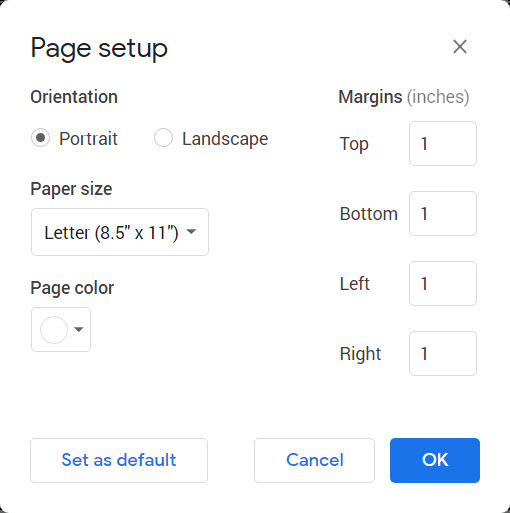
From here, you can set the margins of your document, select from portrait or landscape page orientation, choose paper size, and even the background colour of your document.
Margins can also be adjusted manually by clicking on the little blue arrows on the ruler and dragging them to where you would like to set your margins. The ruler should be just under the toolbar, but if you happen to not see it then click on the “View” menu option and select “Show ruler”.
Formatting in Google Docs
After creating your new document, you can format it many different ways.
The main tool you’ll likely use for formatting is the toolbar across the top of the document.

You’ll see (from left to right) the undo and redo buttons, a print button, spelling and grammar check, a paint roller button that will apply the current format settings to any text that you highlight, zoom, paragraph styles, font type, font size, bold, italic, underline, font colour, text highlighting, hyperlinking, adding a comment box, inserting an image, text alignment (right, center, left, justify), line spacing, numbering, bullet points, indentation, and finally a button to clear formatting.

At the very far right along the toolbar, you’ll notice a pencil with “Editing” written beside it. If you click the little arrow to the right of that, you can switch the mode you are in from editing, to suggesting, to viewing.
Suggesting is a helpful mode if you want to suggest changes to a document without implementing the edits just yet - it allows the opportunity for other users to review your suggested changes.
Viewing mode prevents any changes from being made and might be more helpful if you are printing or reading a document and want to avoid accidentally making a change.
Many formatting tools can also be found under the “Insert”, “Format”, or “Tools” menus just above the toolbar. These include some of the formatting options found on the toolbar as well as more specialized functions.
Using the “Insert” menu, you can:
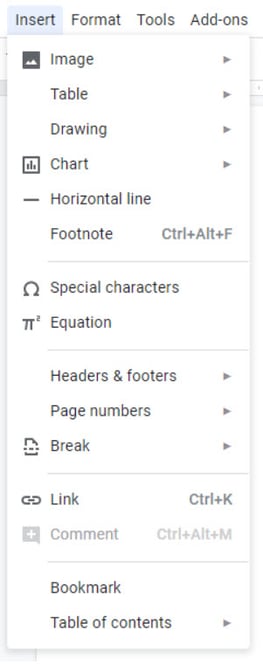 Add an image to your document
- Add a table to your document
- Add a drawing, which can pull an illustration from your Drive or trigger a pop-up paint tool to create a new drawing to be embedded in your document
- Add a chart to your document, which can pull a chart from a Google Sheets spreadsheet, or you can create a new chart by selecting the style of chart you prefer (bar, pie, line, column) and then inputting your data manually
- Add a horizontal line to your document
- Add a footnote (the keyboard shortcut for this is Ctrl+Alt+F - more on these below)
- Add special characters (such as Greek letters and symbols) or equations
- Add a header and/or footer
- Add page numbers
- Add a page break, which will enable you to start a new page
- Add a hyperlink to a website or even link to another spot in your document
- Add a comment box to provide feedback to collaborators
- Add a bookmark to your document, which can make it easier to find that spot later on or even incorporate it into a table of contents
- Add a table of contents (note: you will need to format your document using the paragraph styles in the toolbar for titles, subtitles, headings, subheadings, and normal body text in order for this function to work)
Using the “Format” menu:
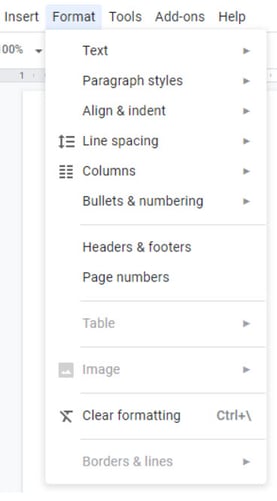 “Text” will enable you to format your text to be italic, bold, underline, strikethrough, subscript, or superscript; there are also options to format the capitalization and font size.
- “Paragraph styles” has tools to add borders to certain paragraphs as well as the preformatted paragraph styles for title, heading, subtitle, subheading, and normal body text (these are important if you want to create a table of contents). You can also save default styles for each of these pre-formatted options (e.g. the font type, size, colour, etc.).
- “Align and Indent” shows you all of the options for text alignment and can also increase or decrease indentations in your document. There is also an option for setting indentations to your preferences.
- “Line spacing” can easily convert your text to single space, 1.5 spacing, or double spacing. There are also options to insert a space before (above) or after (below) the paragraph or line item that you are working on. If you needed spacing that was not single, 1.5, or double spacing, then you would also find the tool to set custom spacing here.
- “Columns” will insert columns into your document based on your specifications: one, two, or three columns. You can also toggle the spacing between columns and opt to put a line between columns by selecting “More Options”.
- “Bullets & Numbering” inserts either bullet points or numbered points into your document. You can choose from a variety of styles depending on how you would like to structure your lists.
- “Headers & Footers” will help you format any header or footer that you added from the “Insert” menu. This might include the spacing around the header or footer as well as if you want a different header or footer for the first page, or a different header or footer on odd and even pages (for example, as you might see in a novel where the title of the novel is in the header of the even numbered pages and the title of the chapter is in the header of the odd numbered pages).
- “Page numbers” similar to header and footers, you would need to insert the page numbers from the “Insert” menu and then format them using this option. Use this option to select if the page number will be in the header or footer, if you want a page number on the first page of your document, and what number to start from.
- “Table” will help you add, delete, or insert rows and columns in a selected table (that would have been added using the “Insert” menu). The distribute rows or distribute columns function will create even spacing between rows or columns, respectively. Table properties also allows you to change the colours, spacing, and indentation of your table. Note that you have to click on the table that you wish to format and then click the “Format” menu.
- “Image” allows you to crop the selected image, replace it with a different image in the same spot, and adjust the transparency, brightness, or contrast of the selected image.
- “Clear formatting” will remove all of the formatting from your document and leave you with plain text.
- “Borders & lines” allows you to adjust the size, colour, and transparency of borders and lines around paragraphs (but not for tables, you have to use the table formatting tool for that)
Under “Tools”, you will find:
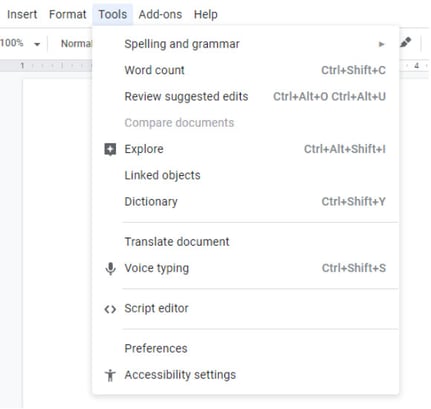 Spelling and grammar options that include running a spelling and grammar check, whether you want Google to show spelling or grammar suggestions in your document, and your personal dictionary if you’ve ever added a word to your dictionary that Google thought you had misspelled. (Note: to add a word to your dictionary, right click the word that Google thinks you have misspelled and select the “add to dictionary” option to prevent Google from highlighting this as a misspelled word in future.)
- Word count tool, which simply shows you the number of words, pages, and characters in your document. You can also select to display a word count while typing to see your word count in real time.
- “Review suggested edits” allows you to see the suggestions made in “suggesting” mode by yourself or other users and implement or decline those changes.
- “Compare documents” is a newer tool from Google that allows you to view two documents at the same time in order to compare them. This might be helpful, for example, if you have different versions of similar documents that you want to combine into one.
- “Explore” is a neat tool that actually scans your document and provides results of related searches. It also allows you to run a search in the same screen as your document.
- “Linked objects” shows all of your hyperlinked web pages, documents, charts, tables, slides, drawings, and more in a side panel.
- “Dictionary” opens up a dictionary in the side panel so that you can easily search for definitions, synonyms, and spellings.
- “Translate document” will use Google translator to translate to another language. A word of caution with this tool that it doesn’t necessarily produce the most nuanced or accurate translation, but gets across the general idea.
- “Voice typing” allows you to create your document using speech-to-text. However, you’ll have to do formatting or insertion of pictures, tables, and charts manually.
- “Script editor” opens a new window where you can write code.
- “Preferences” provides options for whether or not you want Google to automatically format certain ways, such as automatic capitalization, automatic linking, and automatic substitutions.
- “Accessibility settings” has options for screen readers, magnification, braille, and announcing when a collaborator has entered or exited your document.
Keyboard Shortcuts in Google Docs

There are a number of handy keyboard shortcuts for completing various functions and formatting in a Google Doc (and often in other programs as well).
Thankfully, Google has included many of these shortcuts alongside the menu items. For example, if you look under the “Tools” menu, to the right of each menu item you may see a combination of keys in grey - that is the shortcut for the associated tool.
Of course, there are some other keyboard shortcuts that aren’t included in these menus.
These shortcuts can also vary depending on the type of operating system you are using. The most comprehensive list of shortcuts (separated by operating system types) can be found here.
Using Add-ons in Google Docs
As if Google didn’t already offer so much in its Docs program, it also has available Add-Ons or extensions you can use to enhance this cloud-based productivity app.
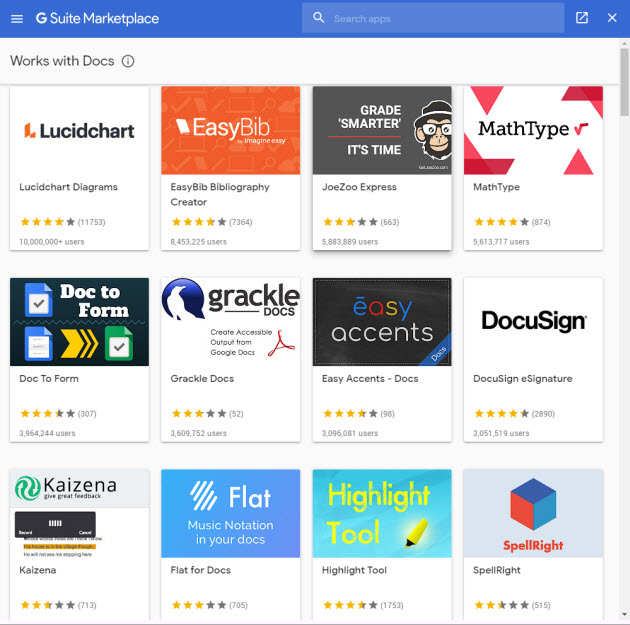
You’ll see the “Add-ons” option above the toolbar with the other menu options. Select “Get add-ons” to see what programs are compatible with Google Docs. For example, the DocuSign add-on can help you turn your document into one that can be electronically signed in a secure manner (great for Real Estate Agencies). The options are endless, and you can browse them in the G Suite Marketplace.
If you need something custom for your business, Suitebriar's team of Google Cloud professionals would be happy to assist you in developing a custom solution to make Docs work better for your business.

Syncing to the Cloud
Google Docs documents are automatically saved to the cloud in real time, so you never risk losing your work.

Docs also tracks your changes and saves versions periodically, so it’s easy to go back in time and restore a previous version of your work. As a web-based program, Docs also has a couple of other huge advantages:
- the ability to access documents from anywhere, and
- the ability to collaborate in real time.
Multiple users can work on the same document at the same time and you can also access the document from any device at any time.
There are even options to make documents available offline so that you can continue to access the document even if you don’t have internet access. While working offline impedes real time collaboration or syncing, it is still a useful tool to be able to access documents anywhere and anytime (especially if you'll be traveling).
It’s worth noting that changes made in offline mode will not be saved or synced until you are reconnected to the internet, unless you save a local copy of the document to your computer (more on that below).
To turn this feature on, click the menu in the top left corner of Google Docs or Drive and select “Settings”, then toggle the “Offline” setting to on (it should turn blue to indicate that it is turned on). Note that this will make documents available offline only on the devices for which this setting is changed, so it is not advisable to do this on shared or public computers where you may be worried about privacy. It's a great choice for your Chromebook, phone, or tablet.
Uploads and Downloads

If you created a document in Docs, you can download that file in a number of different formats including Microsoft Word (.docx), PDF (.pdf), Rich Text Format (.rtf), Plain Text (.txt), OpenDocument (.odt), Web Page (.html), and even EPUB Publication (.epub).
This can be particularly useful for sharing the document in different formats or for saving a local copy of the file to your computer in order to work on it and save as you go while you’re offline.
Likewise, via Google Drive and Gmail, you can upload and open documents in Google Docs for further viewing or editing.
In Google Drive, this can be done by clicking that Google-colored plus symbol, choosing “File Upload” to upload your file to the Drive and then from there right click on the file, select “Open With”, and select Google Docs or the program of your choosing.
Google Docs: A Powerful Tool

More and more people are flocking to the Google Suite of programs, including Google Docs, because Google's productivity apps are accessible, functional, and user friendly.
And as a free program available to everyone for personal use, Docs is becoming the default word processing software of the next generation of workers (which is why so many small businesses and startups are choosing G Suite over Office 365.
G Suite for Business pricing plans are incredibly affordable for a group of products that are highly compatible and functional, designed to work in today's collaborative, connected, cloud-based world.

You May Also Like Our Other Google App Guides
Additional Google Docs Resources We Love
Here are a few of our favorite resources and guides for Google Docs. If you didn't find exactly what you needed in this article, we suggest checking one of these fantastic resources:
- What Can You Do with Docs? - G Suite Learning Center
- The Ultimate Guide to Google Docs - HubSpot
- Guide to Google Docs - Hiver
- Prolific Oaktree's YouTube Video:


.jpg)