Customer Relationship Management software (CRM) help sales teams in many aspects such as organizing contacts, managing leads and different opportunities. Expensive CRMs have great functionality, but for those who want an effective solution that does not break the bank, using Google Sheets CRM is a great and easy alternative.
To set up your own CRM, there a few ways to analyze your business, and steps to take.
Define Your Sales Process
In order to create a CRM with a spreadsheet, you will need to decide what information is important for you to include. You must decide what your sales process actually is, as well as what information is most important regarding deals and contacts. If you go through this process in the very beginning, it will save you time, and prove to be very helpful later on. Some aspects to consider:
- How contacts should be tracked: You should have a sheet that tracks your contacts whether they are leads or customers. You may want to simply indicate which type of customer this is by creating a column that indicates it.
- How deals will progress: Deals are essentially opportunities that you are attempting to close. Make a separate spreadsheet that tracks the progress of your different deals. This will teach you to identify how you move deals, and which stages they are in at different times.
- Pipeline process stages: There are different stages in your sales process for both leads and deals. These should all be tracked in your CRM as well. The different stages in your pipeline might progress as such: Incoming inquiries, Qualified leads, Consultations, Proposals, Contract, and finally Win/Loss (whether or not they will become your client).
- How you identify leads sources: Track this by knowing where your leads come from. This will be helpful to make decisions on where to invest your marketing efforts. Indicate whether a lead or sale came from an online advertisement, a lead generation campaign, or even a personal referral.
Use a Google Sheets CRM Template
Using a template is a very easy way to create your first spreadsheet.
In my view, using an example as a CRM template is the best way to get used to using Google Sheets as a CRM.
Below is a template you may model your Google Sheets CRM after. It is very simple, and allows you to put in all of the information you should need to keep track of sales information, companies, owners, when you contacted them last, and their contact information.

You may need a more advanced CRM for your business, and if you do feel free to seek out a different template to use, or to build upon and customize this example.
Create Your Google Sheets CRM
Create Your Spreadsheet
The next step is to create your spreadsheet and get it ready to configure with either the above template, or your own creation.
There are a few items to decide on, that will make it easier to organize your spreadsheet later on.
- Decide where data should be accessed: This is important because you will need to decide if you want to work with your file on your desktop, or saved in the cloud. If you choose to save on the cloud through Google Drive, you will have the ability to work on your document from anywhere, on any device. Also, you will be able to allow other team members to access your CRM.
- Create your sheets: In Google Sheets you can create different pages on one master spreadsheet. This allows you to have different sheets from tracking contacts or deals. For example, Sheet 1 can be for Contacts. This means the people you communicate with. This can be anyone including new leads, customers, partners, referrals. This will help you to record conversations and important information. Sheet 2 can be for Deals. This should include any and all sales opportunities, deals you are trying to close, or which you are moving through the sales process to obtain. If you sell products, services, or both, this will be a great help.
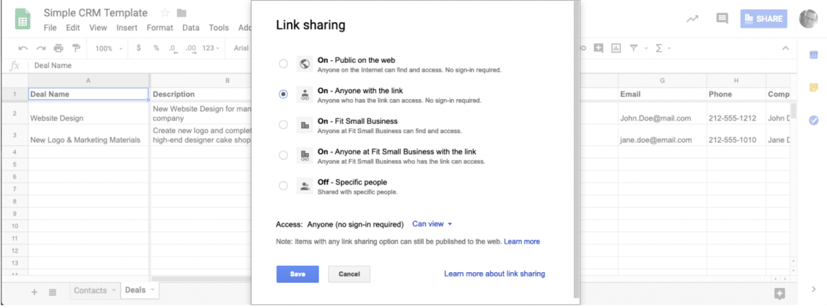
- Specify who you want to access your CRM: Unless this is your own personal CRM, you may want to change your sharing preferences. On Google Sheets it is very simple to set up your CRM so that multiple team members can view and access the CRM at anytime. It makes collaboration extremely easy. As seen below, you can do this but clicking the blue “Share” button at the top right of the screen, then choose to give specific individuals access, or share with anyone in your G Suite organization.
- Set up security and user permissions: This is very important due to the fact that you will be storing other people’s information. G Suite offers an automatic 128-bit encryption to store their customer data, and also uses an HTTPS to transmit that data from a server. These methods are HIPAA-compliant when using a browser based or mobile app version, and finally you are able to restrict access to specific persons.
Name the Column Headings
This is when you will create headers for each column in your spreadsheet.
Each column will hold different information that you want to remember for each contact or deal. You will also use the rows to hold individual records.
If you are using the template this will already be somewhat set up for you, but the headers are very important to be able to quickly search and find specific records.
There are a few main contact sheet headers included in the template, that are recommended to use, to organize your information:
- Contact: Each deal should have a contact person, either a lead or customer.
- Email: Primary contact email
- Phone: Main phone number for said contact.
- Company: The company that the account or deal is related to.
- Title: This is to know where you client fits into the organization. Basically this is good to know if they are a decision maker or middleman.
- Address: Mailing address of your contact.
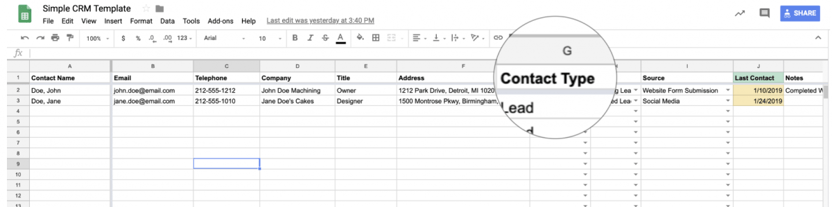
- Contact Type: Lead, customer or different type of contact.
- Stage: This is where you are in the sales process. Whether you are following a new lead, warm lead, or hot lead.
- Source: Knowing your source helps you make better decisions, so this is where you will mention where each contact came from.
- Last Contact: The last time you spoke or communicated with this contact. Update this continuously.
- Notes: Regarding conversations or communications. This is important especially if you share your CRM with other members of your team.
- Owner: The person in your organization who is responsible for the deal.
Below you can see a zoomed circle to show the header for “Contact Type.”
Deal Sheet Headers
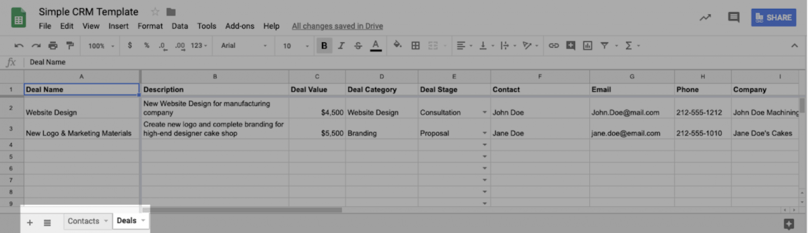
Also of importance, and similar to the contact headers, are your headers on your deal sheet.
You can add additional columns, but the examples are found on the template pictured below.
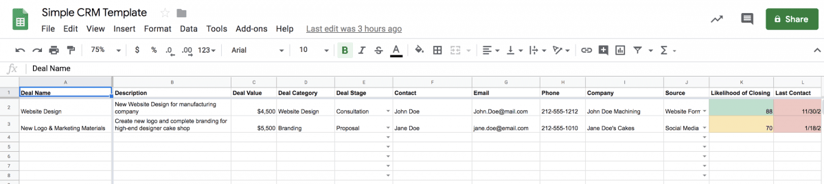
- Deal Name: What each deal will be named. Such as “Website for Franchesca’s bakery.” Make this simple and easy to find.
- Deal Description: This is additional information to describe the deal.
- Deal Value: Estimated value of the deal.
- Deal Category: The type of sales opportunity, used to distinguish in case you work in multiple categories.
- Deal Stage: Use the stages you defined earlier to identify which stage this sale is in.
- Contact: Whom the deal is related to.
- Email: Primary contact email for each deal.
- Phone: Primary phone contact for each deal.
- Company: Company or account the deal is associated with.
- Source: Where your customer came from.
- Likelihood of Closing: If you think you plan to close the deal or if it may be someone to put less effort into right now, and more in the future. It will help you to calculate the current value of the deal.
- Last Contact: Last interaction with your contact for this deal.
- Notes: Any notes regarding a conversation, progress or action on this deal.
- Owner: Who is responsible for the deal.
Importing Existing Data
Whether or not you have been using an expensive CRM or a different method thus far, you may want to transfer over this information to your new spreadsheet. There are a few common ways to do this.
- Manually enter data: If you only have a certain number of contacts to enter you can do so manually. Simply enter one contact record or deal at a time, per row of spreadsheet. If you only have a few contacts this is a great and quick way to transfer your information.
- Import from your email: For many people their email is a place of keeping contacts and communications. If you already use Gmail, you can export your contacts into a CSV file and open this in Google Sheets. For those who have a large amount of contacts, MailParser.io allows you to export emails, and it will automatically put them into your spreadsheet. It is a paid service, but you can use the 14 day trial to start yourself off.
- Import from a different software: If you have used any other form of contact management then you can usually export these in a CSV file. This is also possible if you are using Mailchimp or Constant Contact.
Create Automations and Integrations
One amazing aspect of spreadsheet software is the ability to store information and interact with the data it holds.
This makes your Google Sheets CRM into a tool that you can truly utilize to push your sales to the next level.
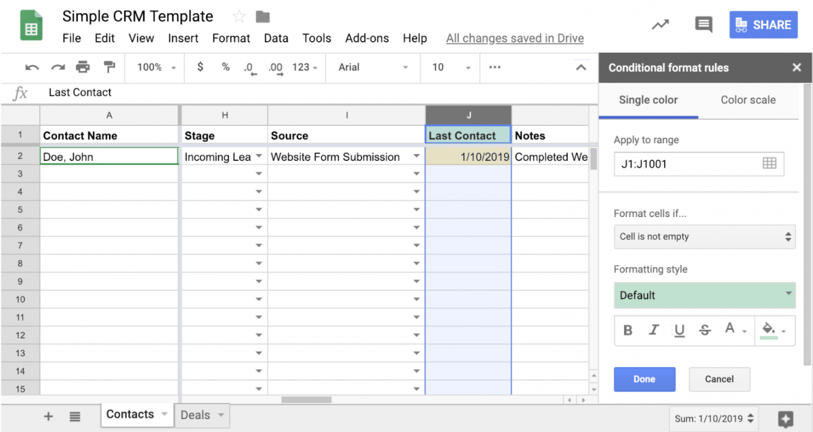
- Conditional formatting: This allows you to create rules for the information in a cell. One example: You can make the cell turn red if the date in the “last contact” album is more than 6 weeks ago. This will alert you that you should reach out to this lead, as shown below.
- First you will select the cell, row or column you want to format, then right click the selection, and click the “format menu”, next select “conditional formatting”.
- Here you will be able to see the rules currently applied, and be given the option to “add new rule.”
- Select “apply to range,” and see your selection. If not, simply add the range of cells you want to add formatting to.
- You will then see the “Format Cells if…” field, and choose the condition that must be met for your rule to apply.
- Finally choose the formatting that will apply when the condition applied is met.
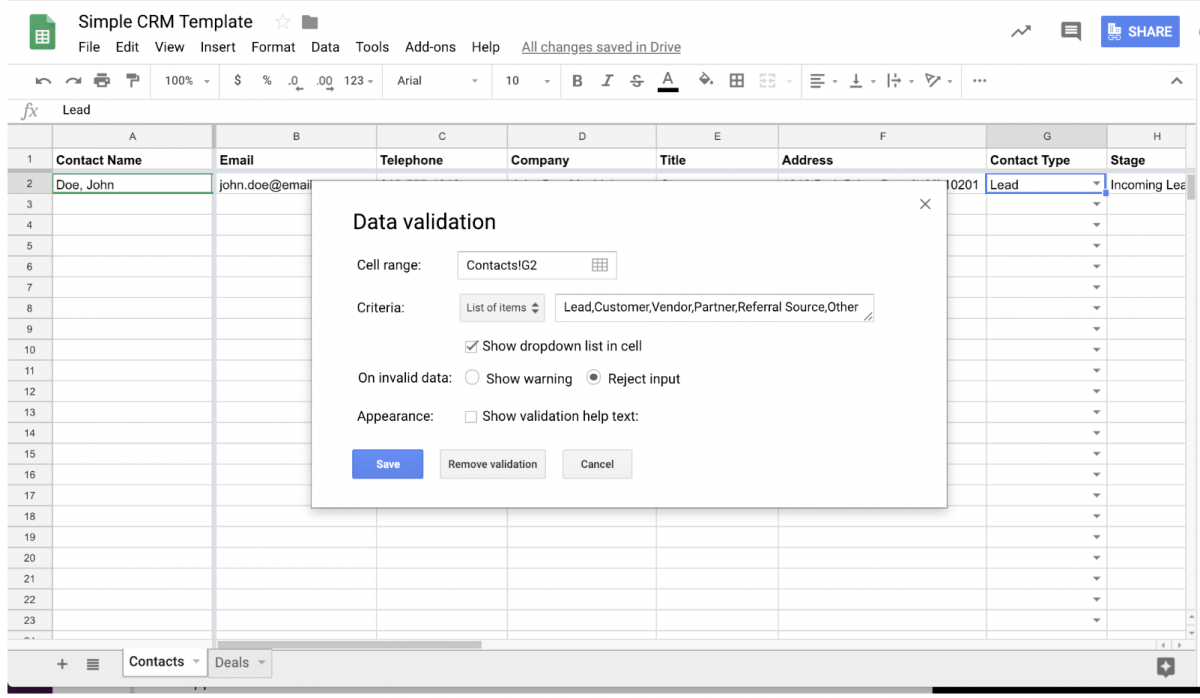
- Data validation lists: Another type of automation is data validation. This means that certain types of data can be added to a cell. In the example below, you can view this in “contact type” and “stage.” The setup process is essentially the same as adding a conditional format, and helps keep your data organized.
- First select the cell, row, or column to which you want to add data validation.
- Right-click or click on the “Data” menu, and select “Data Validation.”
- You will then see your selection in the “cell range” field. If not, you can add this manually.
- Choose the validation you want to use, and enter the list you want to use for the drop down menu, with each term separated by a comma.
- Press “reject input” in the “on invalid data” field, to confirm your terms are valid.
- Save the changes and you are finished.

Generate Reports
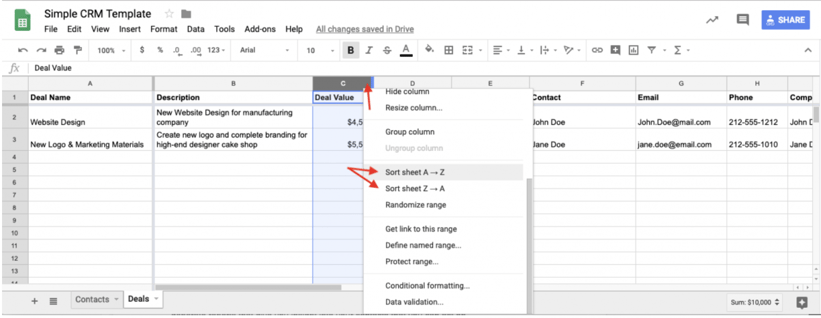
There are ways to easily generate reports with your Google Sheets CRM. First off you can begin by sorting your data by column or row.
In the template used in this article, it is most likely you will want to organize your data by column. You have the option to keep data in alphabetical order, value of deal, or who you have contacted most recently. To sort this data and generate a type of report, put your cursor over the top row and press the selection arrow. You can then scroll the menu and decide whether to sort the column in descending or ascending order.
Essentially, the bottom line is that you do not need to pay for an expensive CRM tool in order to run a successful business (though as your business grows, you may want a more advanced option).
If you are able to keep your information organized, using Google Sheets is a wonderful way to keep your CRM in the cloud, available at all times, and have your data available to share with anyone on your team, whenever you need to.